Table of Contents Add a header to begin generating the table of contents
Materials to build outdoor pizza oven
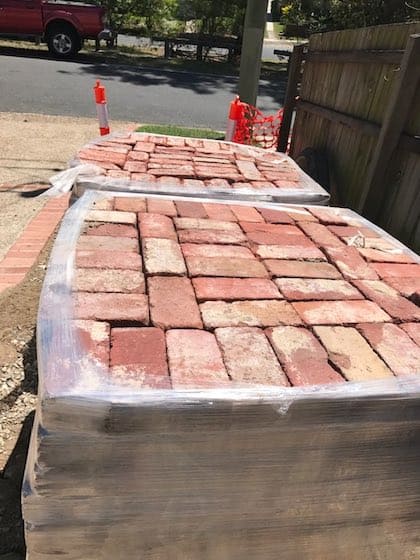
You’ll need solid clay bricks. The quantity depends on the size of the pizza oven and fireplace you’re planning to build. For this project I’ve used 1,200 solid clay bricks. (Note: the quantities of other materials I’ve listed reflect the size of this particular project.) These will be adjusted to suit your project.Most of the bricks manufactured today are extruded bricks. Extruded means the clay is pushed out of a machine, (think of toothpaste), on to a conveyor belt then cut with fine wire before being fired. The bricks have holes in the centre which makes them lighter and less clay is used in the production process. Bricks with holes can’t be used as they won’t withstand the extreme heating and cooling and will eventually crumble and break. You need a solid clay brick. You can find second-hand bricks that are sourced from old buildings. These can look great and give a very rustic effect. I love to recycle and in this project I’ve used hand-made bricks that were over 100 years from an old building that had been demolished. The little piece of history also becomes a talking point as people gather around the fire. 2. For the laying of the bricks you’ll need1/2 meter of brickies loam6 bags of lime 6 bags of cement Lime is added to the mortar to help with movement. The pizza oven will expand and contract as it goes through constant heating and cooling.The mix is 4 parts loam : 1 part lime : 1 part cement 3. To render the outside of the pizza oven a little bit of plasterers sand, cement and lime 4. Concrete blend, cement and some steel mesh to build a base for your oven/fireplace to sit on 5. Clay pavers to line the base of the pizza oven6. chicken wire used on the outside of the pizza oven7. steel reinforcing mesh for the base and suspended slabs8. stainless steel flue8. a fire blanket9. ply board for templates10. jigsaw11. timber studs 75mm x 35mm
Tools you’ll need
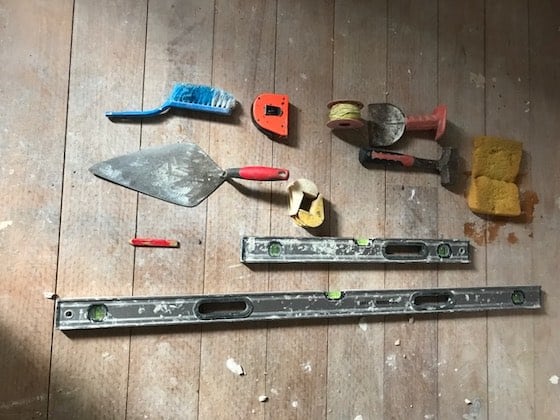
- tap measure and pencil
- brick laying trowel
- string line
- sponge
- lump hammer and bolster
- level
- brush
- shovel
- wheel barrow
- angle grinder with a diamond blade
Postioning your wood fired pizza oven
When choosing a position there are a couple of things to keep in mind 1. Make sure the ground is solid and not fill. There’s going to be a lot of weight sitting for a long time. Fill will sink over time unless engineered with piers into solid ground2. Make sure there’s clear access to direct the smoke from the flue or (chimney) so you don’t get smoke trapped in the area where you are entertaining.
Plan out the project
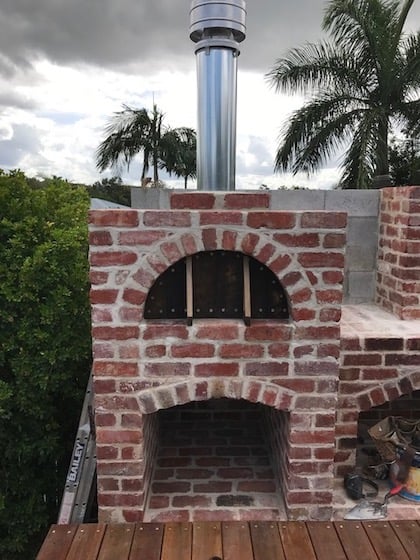
Determine the finished size of you want your pizza oven and fireplace. You might just want a pizza oven or an outdoor fireplace. The project I’ve featured includes a pizza oven, fireplace and wood storage area. Note: The pizza oven needs to be at least 1.2m wide (outside to outside measurement). That’s the measurement of the pizza oven in the picture. The fireplace in the photo is 2.4m wide.
Building a platform for the pizza oven
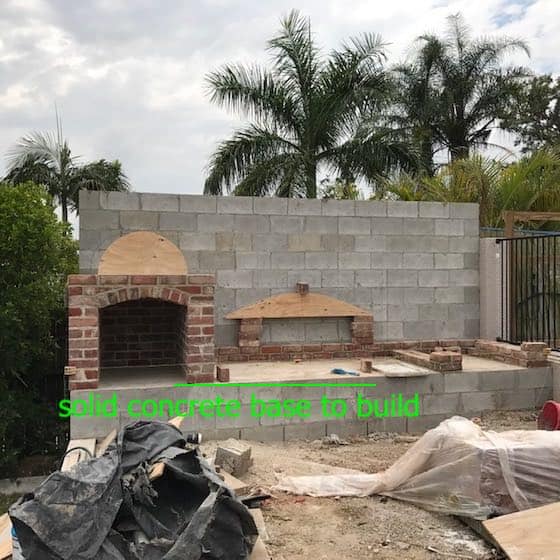 Once you’ve decided on position and size (length and width) of your project, mark out the area and dig some footings. Pour a level slab of concrete. This gives you a solid base to work from to plan and build your pizza oven and fireplace. My project was on a sloping block of land and so the platform had to be built up to match the existing height of a pool area. In this case an engineer was involved to ensure the footings were structurally sound. You may be starting your project on a level base. My level pad was 4.6m long x 1.4m wide. After pouring the level platform I built the back concrete masonry wall up to the required height. (This is an optional addition. A bricklayer would advise on the structural requirements.) Generally you just need a level pad to build your pizza oven/ fireplace. (The added complexity is not needed). This gave me a level pad and a flat wall to plan out my project.
Building the side walls
Check out my tutorial on how to lay a brick
The pizza oven is built to a comfortable height for cooking pizza. I chose a brick base to match the brick oven. There’s also an area underneath the oven to store wood for the fire. The base is 12 courses high. 5 bricks wide and 5 bricks deep. Each side and the back wall should be 2 bricks thick for insulation purposes. The mortar mix is:4 parts brickies loam : 1 part lime : 1 part cement 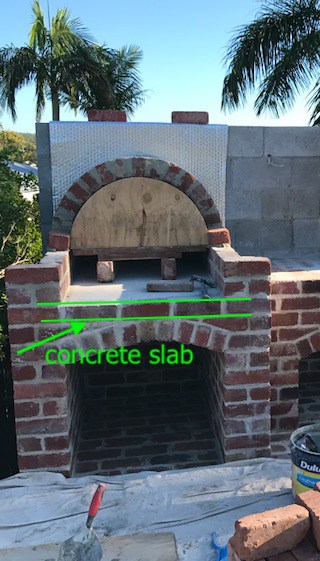 A concrete slab rests on the top of 9th course and finishes on the top of the 10th course.
- Leave the inside bricks out for the slab to sit on
- Use marine ply to support the slab
- Insert reinforcing mesh into the concrete slab when pouring.
This leaves 2 more courses for the fire brick base inside the oven (pavers – I used 50) to retain the heat.
How to build a brick arch for you pizza oven
Check out the detail on this link
Installing the flue
check out the detail here
How to insulate the pizza oven
More detail here
How to make an oven door using the arch template
check out the post move to insulating the pizza oven post 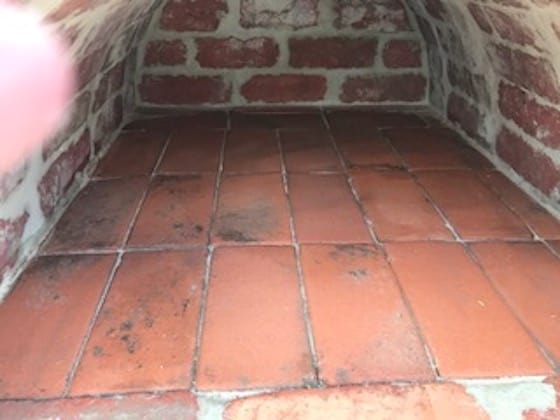 I didn’t mortar these pavers in. The reason: the heat is extreme and I’ve used them as you would a pizza stone. The pizzas can rest easily on the hot clay pavers. They can be easily replaced if they age or get damaged. Lay 2 courses of bricks at the front, place some fire blanket on the concrete to help retain the heat, then placed 3 layers of clay pavers on top, using sand to level if needed.They need to sit firmly inside the border of bricks.I used 3 layers of pavers because it made the base nice and thick. *3 layers is equal to 2 courses of bricks. Lay 2 courses of bricks at the front, place some fire blanket of the concrete to help retain the heat, then placed 3 layers of clay pavers on top , using sand to level if needed, they sit firm inside the boarder of bricks.I used 3 layers of pavers because it made the base nice and thick also 3 layers equaled 2 courses of bricks.