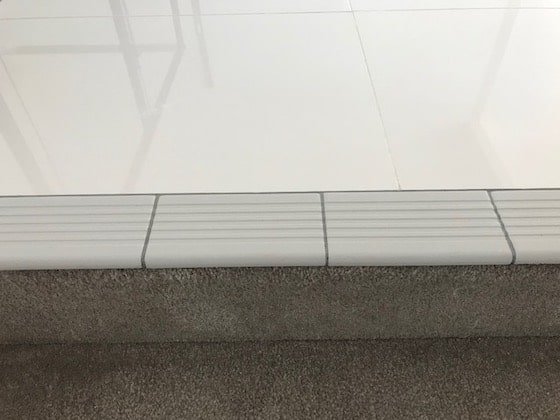
Nosing tiles are the ideal way to finish off your stair-tiling project where porcelain tiles and carpeted stairs meet. This step-by-step guide can be adapted to suit other scenarios such as tiled or timber stairs meeting a tiled floor.
What are nosing tiles?

They’re the ribbed tiles with rounded edges that you see at the edge of stairs to prevent people from slipping.
Commonly used in commercial areas, Nosing tiles provide a strong edge for tiles in high-traffic areas.
- Nosing tiles are slightly thicker, stronger and safer than most tiles.
- The surface has molded grooves to give a sturdy grip when stepping.
- Available in a range of colors and sizes.
Normal tiles can’t be laid with an overhang because they’re too thin, sharp and not strong enough to take the weight of heavy traffic on stairways.
For people who are visually impaired, a darker or lighter color can be chosen as a safer option to highlight the edges. The edge of stairs needs to stand out so it doesn’t become a trip hazard.
Nosing tiles provide a tidy, strong solution where carpeted stairs meet a tiled floor and are a crucial element of many tiling projects.
How to lay out nosing tiles
Step 1
Stop laying floor tiles 1 row out from the stairs. This allows you to plan positioning for nosing tiles.
Step 2 – Positioning nosing tiles
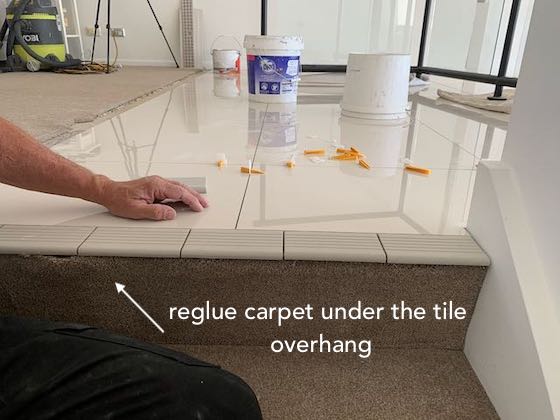
Place nosing tile on the right hand edge of the stair and allow 15 mm overhang, depending on carpet thickness. (If the carpet is particularly thick you may want to allow a little extra.) Mark that position on the floor.
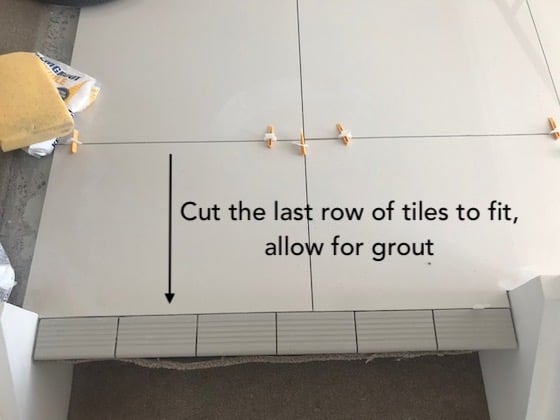
Allow for the thickness of the grout which should match the grout size used for the overall tiling job.
Note: The join size depends on the tiles you are working with. As a guide, if working with terracotta I usually allow quite a big join (around 10mm). Whereas a modern porcelain tile can have a join as small as a 3mm).
Mark this position as well.
Place nosing tile on the left hand side of the stair and repeat. Join the 2 marks with a line. (Marking ensures the nosing tiles will run in a parallel line with the stairs.)
Trade Tip
When you lay your last row of tiles (before the nosing tiles), you’ll be able to adjust for any variation. It’s quite common to need a slight alteration to ensure the starting point for the nosing tiles is in the correct position.
Step 3
Lay floor tiles. Cutting the tiles, if necessary, to fit up to marked area.
Step 4
Set out nosing tiles to see if a cut is needed. Allow for the grout width between each nosing tile. Start one side, working to the other and cut a tile if necessary.

Step 5
Lay nosing tiles. Glue onto the edge of the floor surface using tile glue. Thickness of the glue will be determined by the height of the floor tiles.
Note: The finished surface needs to be the same height.
Step 6
Allow drying time (check glue specs for recommended drying time).
Step 7
Grout the nosing tiles as you would grout normal floor tiles.
If you are unsure on how to grout, check out my DIY grouting video.
Step 8
Allow grout to dry completely

Important
Finishing off:
When the tiling and grouting is completed, if tiles are meeting carpeted stairs, reglue the carpet underneath the tile overhang.


