Is your moldy bathroom vanity overdue for recaulking? Have you been holding off calling the plumber because you’re worried about the cost? Well, worry no more as updating your old vanity is a simple do-it-yourself project. Follow this step-by-step guide with my best kept secret for recaulking.
We recommend products based on our experience and benefit to our DIY community. If you use our links to make a purchase, we may earn a commission which is no additional cost to you. Read our disclosure policy here
Tools & Materials
- Stanley knife or flat blade knife
- 1 tube of white silicone sealant
- Caulking gun (also known as silicone gun)
- 1 tbsp dishwashing liquid
- spray bottle
- wooden popsicle stick
- small piece of cardboard
Trade Tips
- A small amount of dishwashing liquid (approx 1 tablespoon), is used in a spray bottle and applied after silicone has been applied. This makes it easy to remove excess silicone.
- A wooden popsicle stick is used in a sweeping motion to collect excess silicone.
The How To
Step 1
Remove all old silicone and debris from beneath the tiles using a Stanley knife (or other flat blade knife). This is the area where tiles meet the bench top.
Caution: The blade is very sharp
Step 2
Make sure the area is thoroughly dry before applying silicone, as the product will not adhere to a wet or damp surface. If you’re not quite sure if the area is totally dry, wipe with a tissue or gently use a hair dryer to make certain the area is dry.
Step 3
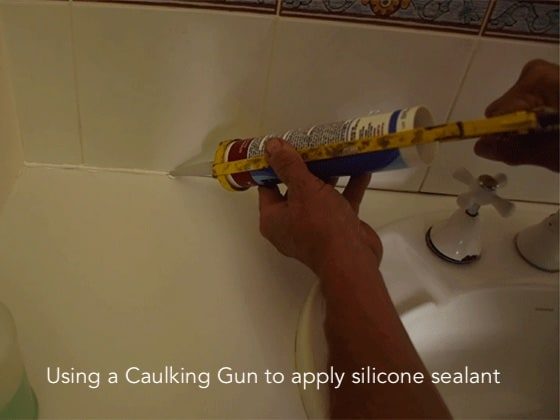
Snip the end of the silicone sealant at a 45 degree angle and insert into a caulking gun.
Step 4 – Recaulking
Squeeze the silicone out along the old silicone line making sure you push the silicone right into the gaps.
Don’t leave any air pockets.

Step 5
Take the spray bottle and add a small amount (approx. 1 tablespoon) of detergent and water and give the bottle a shake. Spray generously over the silicone you’ve just applied.
The detergent works in a way that stops excess silicone from sticking to the tiles or the benchtop when it is cleaned away.
Step 6
Take the popsicle stick and swipe it over the silicone that has been applied and then scrape the excess onto the cardboard.
This naturally forces the silicone into the join to leave a nice sharp finish. Go over the area a couple of times if needed.
There will be quite a bit of excess silicone scraped on to the cardboard.
Important
Don’t get silicone on your hands as it’s very sticky and messy.
Step 7
Leave the silicone to dry for 24 hours. We want the job to set properly so it will last a long time.
There you have it! You’ve quickly and easily removed the grimy, old silicone from the sink, refreshing the appearance at a fraction of the cost you’d pay if you had to call a plumber or tiler.
Re-caulking
Re-caulking needs to be done properly to reduce the chance of further mold and mildew growth through water damage. The process has to be done correctly – it doesn’t take long, but is worth investing the time to reduce the chance of further water damage.
Step 1
Removing old caulking must be done thoroughly so that the new caulking can form a proper seal. Make sure the area is totally clean from old mildew and mold growth.
The tell-tale signs the job needs to be redone.
Often obvious signs occur in places that are often damp or moisture sits. For example where corners and edges meet. Where tiles meet a floor, where a wall meets tiles. the base of a shower or around a vanity, or a bath.
- Mildew stains on the caulk
- Discoloration of caulking
- Caulk is cracking or shrinking
With over 40 years in the Australian building industry, Marty is a master builder, bricklayer, tiler, and landscaper who has seen and done it all. He provides practical, real-world solutions and creative ideas to help you tackle your home projects—inside and out—with confidence. Marty’s advice is built on four decades of hands-on experience, not just theory.


